Phari Lapcha Peak Climbing

Duration18 Days
Trip GradeChallenging
CountryNepal
Maximum Altitude6017 m
Group Size1-12
StartsKathmandu
EndsKathmandu
ActivitiesPeak Climbing
Best TimeAutumn and Spring

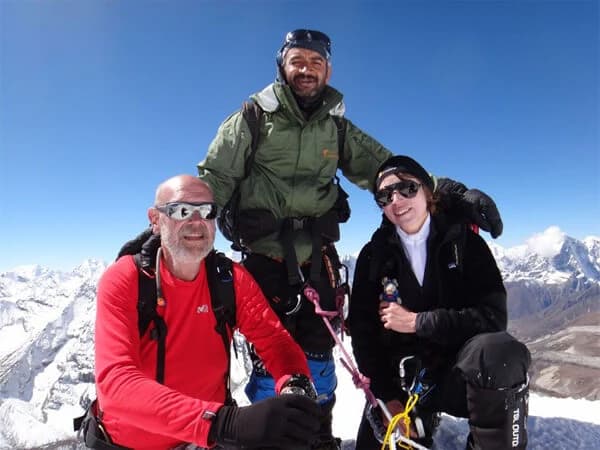
Phari Lapcha is not the kind of climb you choose if you just want an easy summit and a straightforward route. It is a more serious peak in the Everest region, and that is exactly why some climbers are drawn to it. Phari Lapcha Peak Climbing in Nepal is tougher, quieter, and a lot less commercial than many of the usual trekking peaks, which honestly makes it more interesting. Near Gokyo, the route takes you through rough trails, glacier sections, and long days that feel like real climbing, not just high altitude hiking. If you want something that feels a bit more serious and a lot less packaged, Phari Lapcha is a very solid choice.

Where exactly is the Phari Lapcha Peak Climb located?

Phari Lapcha Peak is a real Peak climbing in Nepal which sits in the Khumbu region near Gokyo and Machhermo at about 6,017 meters and is part of the Himalayan mountains inside Sagarmatha National Park. According to the Nepal Mountaineering Association, it is an official trekking peak, which makes it a recognized spot for climbers looking for a serious Himalayan adventure.

History of Phari Lapcha Peak Climbing

The first official climb of Phari Lapcha Peak in Nepal happened on May 19, 2003. Marcelo and Juliana Belo and their international mountaineering team, with help from experienced Nepalese Sherpas Climber Guide, reached the summit via the northwest ridge. They crossed steep snow slopes and glaciers along the way. This climb is considered the first permitted ascent and helped make Phari Lapcha a known destination for high-altitude trekking and Himalayan mountaineering.

Phari Lapcha Peak Climbing Route and How to Reach It

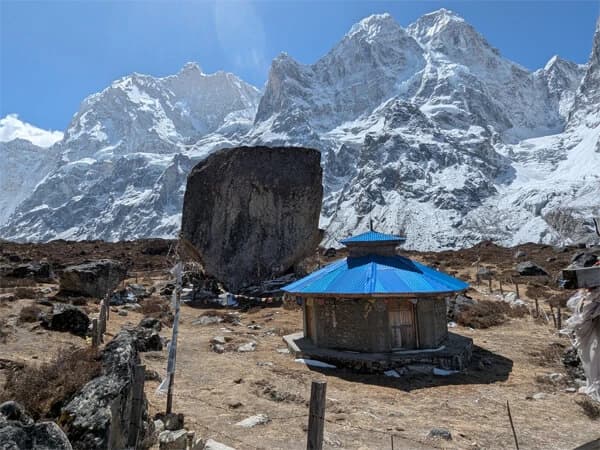
Climbing Phari Lapcha Peak begins with a trek through the Everest region of Nepal. Most climbers fly into Lukla, a small airport on the edge of a cliff. From there, you walk through Namche Bazaar, Dole, and Machhermo. This trek helps your body adjust to the high altitude while letting you see mountains, lakes, and small villages along the way.

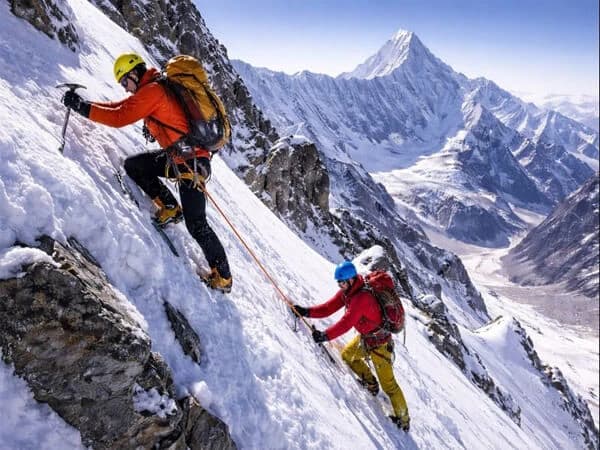
After a few days of trekking, you reach Gokyo, the last village before the actual climb starts. From Gokyo, you move across glaciers, snow slopes, and rocky terrain. Climbers need mountaineering gear like crampons and an ice axe and should go carefully because the trail can change depending on weather conditions.

Phari Lapcha is quieter than many other peaks in the Everest region. The climb combines high altitude trekking, glacier travel, and mountaineering, giving a full Himalayan experience. Climbers who have done Everest Base Camp, Gokyo Lakes, or Island Peak will find Phari Lapcha a different and worthy Climbing adventure.

Why Phari Lapcha Peak Climbing Stands Out

Phari Lapcha Peak is different from many other climbs in the Everest region because it is quieter and more adventurous. Unlike busy trails like Everest Base Camp or Gokyo Lakes, here you can focus on the mountain and the climb itself.

On the way up, you start by walking past lakes and villages and then move onto glaciers and snow slopes. One day you might be on a rocky path under the sun and the next day carefully crossing ice, testing each step. It feels like a real mountain climb but is possible if you are ready and fit.

The view from the top is special. You can see the surrounding Khumbu peaks and feel like you are in your own quiet part of the Himalayas. Phari Lapcha is for anyone who wants a mountaineering adventure in Nepal that is serious and less crowded than other popular peaks.

Phari Lapcha Peak Highlights

  • The climb is in the Everest region of Nepal, near Gokyo and Machhermo.
  • The approach trek starts from Lukla, passing through Namche Bazaar, Dole, and Machhermo before reaching Gokyo.
  • Phari Lapcha combines high altitude trekking with real mountaineering, including glacier travel, snow slopes, and rocky sections.
  • It is less crowded than other Everest region peaks, so you get more time to enjoy the mountain.
  • Climbers need basic mountaineering gear like crampons and an ice axe.
  • The route offers stunning views of Khumbu peaks, lakes, and Himalayan villages along the way.
  • The climb is challenging but achievable for climbers with some experience and good fitness.
  • It gives a different experience from popular treks like Everest Base Camp, Gokyo Lakes, or Island Peak, mixing trekking and technical climbing.
  • Gokyo serves as the base camp for the technical part of the climb.
  • The summit offers quiet and private panoramas of the surrounding Himalayas.

Unique Experiences on the Phari Lapcha Peak Climb

Phari Lapcha Peak is more than just snow and rocks. On the way, you trek through small villages where the locals are welcoming and serve simple meals and tea, even when life is hard. Their hospitality feels real and personal, not staged for tourists.

The climb itself is challenging and raw. You move from lakes and valleys to glaciers and snow slopes, feeling the altitude and testing each step. You also see yaks carrying loads, herders at work, and children running to greet trekkers, which makes the experience more human and grounded.

From the top, the view of the Khumbu peaks is quiet and personal. There are no crowds, just the mountains and the sky. Phari Lapcha Peak is for anyone who wants to see the Himalayas and local life in a way most trekkers do not.

Types of Phari Lapcha Peak Climbing Packages in Nepal

If you are thinking about climbing Phari Lapcha Peak, there are a few ways to do it. The fully guided package for the Phari Lapcha Peak climb is the easiest. You have a guide with you the whole time, tents and meals are ready at Base Camp and High Camp, and the guide handles all the climbing gear. You just focus on walking and climbing.

The semi guided package for the Phari Lapcha Peak climb is more hands on. You still have a guide for safety, but you carry some of your own gear and help a little with tents. It is good if you have done some trekking before and want to be more involved.

The fully camping package for the Phari Lapcha Peak climb is the toughest and most authentic. You carry personal and shared gear, cook at Base Camp and High Camp, and sleep in tents. It can be hard, but it gives a real high altitude expedition feel. Nepal Trekking Routes can adjust any package for your pace, fitness, or schedule to make the climb safe and realistic.

18 Days Phari Lapcha Peak Climb Itinerary at a Glance

You start in Kathmandu and fly to Lukla to begin your trek through Namche Bazaar, Machhermo, and Gokyo. You reach Phari Lapcha Base Camp at 5,200 meters, then move up to High Camp at 5,700 meters before summiting the 6,017 meter Phari Lapcha Peak. After the climb, you retrace your steps back through Machhermo and Namche Bazaar to Lukla and fly back to Kathmandu.

This standard Pari Lapche Peak Climbing itinerary is 18 days, but some Phari Lapcha Peak climbing packages offer longer 19 or 20 day Phari Lapcha peak climbing itineraries with extra acclimatization days, side treks to Gokyo Lake or Everest viewpoints, and more time to enjoy the higher altitude landscapes.

Who should attempt Phari Lapcha Peak Climbing in Nepal

Phari Lapcha Peak in Nepal is a high mountain over 6,000 meters. Climbing it is not an easy trek in Nepal. You will hike on snow, cross glaciers, and use climbing equipment. It is hard work and you need to be ready for cold weather and thin air, but the views of the Himalayas are amazing.

You should attempt Phari Lapcha climb if you:

  • Have experience with high altitude trekking or mountaineering in Himalaya
  • Are physically fit and can handle long climbing days
  • Know how to use climbing gear like ice axes, ropes, and crampons
  • Are ready for cold weather and altitude challenges

This peak is for people who want real adventure in Nepal. It is challenging but gives a strong sense of achievement and amazing mountain views for those who reach the top.

Exact Permit Requirement for the Phari Lapcha Peak Climb 

If you’re planning Phari Lapcha Peak Climbing in Nepal, the permit part is actually not that complicated once you know what’s what. People often overthink it and start mixing it up with other climbs in Nepal, but Phari Lapcha has its own clear set of permit requirements. You do need proper paperwork, but not a whole mountain of it.

The main one is the Phari Lapcha trekking peak permit from the Nepal Mountaineering Association. This is the actual climbing permit for the peak. Since Phari Lapcha is listed as a trekking peak, this one is non negotiable. No permit, no proper climb.

You’ll also need the Sagarmatha National Park Entry Permit because the mountain sits inside the Everest region. On top of that, the Khumbu Pasang Lhamu Rural Municipality Permit is also required. These are standard permits for trekking and climbing in the Khumbu, so they’re part of the normal process.

Now here’s where people get confused. A lot of trekkers still ask about the TIMS card for Phari Lapcha Peak Climbing, but no, that is generally not required here. Same thing with the restricted region permit. You do not need one for the Phari Lapcha climb because this route is not in a restricted area of Nepal.

Another thing that matters is the garbage deposit for the Phari Lapcha climb. This is part of climbing rules in Nepal and it’s there for a reason. If you’re going up a mountain, you’re expected to bring your waste back down too. Fair enough, honestly.

So if you want the simple version, the permits for the Phari Lapcha climb are the Nepal Mountaineering Association permit, the Sagarmatha National Park permit, the Khumbu Pasang Lhamu permit, and the garbage deposit requirement. That’s really it. No extra mystery permit, no hidden paperwork surprise, and no need to make it more dramatic than it is.

Phari Lapcha Peak Climbing Cost

If you are planning Phari Lapcha Peak Climbing in Nepal, the total cost for most people usually falls between $1800 and $2500 per person. This includes trekking, climbing, permits, guide and porter support, food, and basic gear rentals.

For example, some climbers carry their own gear and move a bit faster, so they spend closer to the lower end. Others may take extra days, hire more help, or rent additional equipment, which brings the cost toward the higher end.

Overall, this is a realistic budget for a proper Himalayan peak climbing adventure. It covers what you need for a safe and comfortable climb without going overboard.

Significance of Guides and Porters for Phari Lapcha Peak

You can try Phari Lapcha Peak climbing on your own, but mountains don’t care how fit you are or how many hikes you’ve done. A Climbing guide knows the trail, glaciers, snow slopes, and how the weather can change in minutes. They also help manage camps, keep you safe, and give tips to handle altitude.

Porters are the real heroes. They carry your heavy gear, tents, and food. You think your backpack is heavy, then see a porter carrying double that uphill like it’s nothing. They make the climb much easier and less painful.

The best part is the laughs. Sitting at camp after a long day, sharing food, and hearing your porter joke about your struggles makes the climb feel real and fun.

Guides and porters are essential as they make the mountain feel less scary and more like an adventure.

Why Book Phari Lapcha Peak Climbing with Nepal Trekking Routes?

We are a local travel company based in Nepal and have been organizing treks and climbs in the Everest region for years. We provide authentic service and make sure you get real value for your money. Safety is always our top priority, and every decision we make is focused on keeping our guests safe on the trail and on the mountain.

With us, you are not just another booking. You get local knowledge, experienced guides, proper support, and a team that genuinely cares about your Phari Lapcha Peak climbing experience.

Itinerary

This is an 18 day itinerary for climbing Phari Lapcha Peak in Nepal. The trek starts from Kathmandu, goes through Lukla, Namche Bazaar, Gokyo, and the high camps, and finishes back in Kathmandu.

The main highlights include hiking to Gokyo Ri, reaching Phari Lapcha Base and High Camp, and summiting the 6,017-meter peak. The route also includes high altitude camps and the return trek through Machhermo and Namche Bazaar.

Nepal Trekking Routes can customize the itinerary to fit your schedule, fitness, and preferences, making the climb safer and more enjoyable.

Trip PlanExpand All

Welcome to Nepal. When you land at Tribhuvan International Airport, a representative from Nepal Trekking Routes will meet you. They’ll help with your bags, arrange transport, and get you to your hotel. After checking in, you can relax and grab something to eat to recover from your flight. Overnight in Kathmandu.

Max Altitude: 1400 m

You’ll go through your gear carefully, checking boots, crampons, harness, clothing, and sleeping gear. Your guide from Nepal Trekking Routes will walk you through the route, discuss timing, and explain what to expect on the trek and the climb. You’ll also take care of any last permits or paperwork and pick up any extra snacks or supplies you need. There will be time to ask questions about altitude, how you will walk, or anything about the trek so you feel confident before leaving Kathmandu.

Max Altitude: 1400 m

You’ll catch an early flight from Kathmandu to Lukla with your guide from Nepal Trekking Routes. Once you land, you’ll sort your bags and start walking toward Phakding. It’s a short first trekking day to help your body adjust to the altitude and get used to walking with your gear. The guide will keep the walking speed comfortable and check that everyone is feeling okay at this stage. You’ll reach Phakding and settle in at the lodge, rest, and make sure your gear is ready for the next day.

Max Altitude: 2610 m

You leave Phakding in the morning and start gaining altitude steadily toward Namche Bazaar. The trek is longer than the first day, so you’ll move at a pace that keeps everyone comfortable. Your guide will monitor how your body is reacting to the altitude and suggest short breaks when needed.

You’ll pass small villages where locals live and trade, and the trail gradually climbs with a few steeper sections that give your legs a proper workout. By the afternoon, you’ll reach Namche Bazaar, check into your lodge, and take some time to rest. You can unpack your things and sort any small supplies you might need.

Max Altitude: 3440 m

Today you’ll stay in Namche to let your body be okay with higher altitude. The guide might suggest a short hike up to a nearby point and then back down so your body can adapt without pushing too hard. You’ll have time to organize your gear, check that everything for the next stage is ready, and get some rest. It’s also a good chance to talk with your guide about the coming days, confirm plans for the climb, and make sure everyone in the group feels comfortable with the pace and route.

Max Altitude: 3440 m

After your breakfast, you’ll leave Namche and start heading toward Dole. The climb is steeper than the previous days, so the guide will keep a steady pace and make sure everyone takes breaks when needed. After a few hours of walking, you’ll notice the trail gets quieter and the lodges smaller, which makes it feel more like you’re moving deeper into the mountains. By the afternoon, you’ll reach Dole and check into your lodge. You can rest and get some food before getting comfortable for the night.

Max Altitude: 4038 m

After your breakfast, you’ll leave Dole and continue up toward Machhermo. The trail climbs gradually, and the air is thinner, so the pace will be slower than earlier days. Your guide will check in regularly to see how everyone is feeling and suggest short breaks when needed. The lodges here are smaller, and the area feels quieter, more remote. When you arrive in Machhermo you’ll check in into your lodge. You can rest, eat, and take a bit of time to look at the surrounding before heading higher tomorrow.

Max Altitude: 4470 m

After breakfast, you’ll leave Machhermo and follow the trail up toward Gokyo. The day is longer than the previous ones, and the thinner air makes the climb feel harder, so it’s smart to keep a steady pace. You’ll reach Gokyo in the afternoon and settle into the lodge there. You can rest for a bit, grab something to eat, and talk with your guide about the hike to Gokyo Ri tomorrow. The evening is calm, and it’s a good chance to relax and mentally prepare for the journey in the higher altitude ahead.

Max Altitude: 4790 m

You’ll head up to Gokyo Ri in the morning. The climb is steep and the altitude makes each step a bit heavier, so you’ll pace yourself and take short breaks when needed. When you reach the top, you get a real sense of how high you are, the lake below looks tiny, and the surrounding peaks feel massive and close. You can take a moment to breathe and take it all in before heading back down. On the way back to Gokyo, you can grab something to eat, talk with your group about how the hike felt, and go over the plan with the guide for moving toward Phari Lapcha Base Camp.

Max Altitude: 5357 m

You’ll leave Gokyo and start heading toward Phari Lapcha Base Camp. The trail gets rougher and quieter, with fewer lodges, and the altitude is starting to feel serious. By the afternoon, you’ll reach the base camp area where tents will be set up. You’ll pitch your own tent or help with the team setup, organize your climbing gear nearby, and get a sense of the layout. There’s time to sit down, eat, and let your body adjust before moving higher tomorrow. The air is thinner here, and even walking short distances can feel tiring, so moving carefully and staying hydrated is important. Overnight in tent.

Max Altitude: 5200 m

We’ll start heading up from Base Camp toward High Camp. The climb is short compared to the summit push, but the thinner air makes every step a bit heavier, so we’ll take it slow and pause whenever anyone feels tired. Once we reach High Camp, we’ll set up the tents and make sure everything you’ll need for tomorrow is ready nearby. You can walk around a little to stretch and get used to the altitude, check how your boots and crampons feel, and go over the route together. The rest of the afternoon is relaxed, giving everyone time to hydrate, and talk about the plan for the summit so there are no surprises in the morning.

Max Altitude: 5700 m

We will start very early before sunrise because the climb takes several hours and the weather is usually calmer in the morning. The first section is steep but manageable and we will keep a steady pace, taking short breaks whenever anyone needs to catch their breath. As we gain altitude, the air gets thinner and each step feels heavier, so it is important to breathe steadily and focus on footing.

When we reach the summit, you will see the surrounding peaks and glaciers up close and feel how high you really are. After spending some time at the top, we will carefully make our way back down, keeping the group together and stopping as needed. Once we reach Base Camp, you can rest in your tent and recover from the day while staying warm and hydrated. 

Max Altitude: 6017 m

Today we’ll stay at Base Camp. Sometimes the weather doesn’t cooperate, or the team might need extra rest after the summit, so we use this day to adjust. You can stretch your legs a bit, check your equipment, or just relax in the tent. It’s also a chance to talk with the guide about the route back and make sure everyone is feeling good before starting the descent.

If the weather is clear, some people like to take a short walk nearby to get a slightly different view of the surrounding peaks without pushing themselves too hard. Overnight.

Max Altitude: 5200 m

We’ll start the descent from Base Camp, moving carefully since your legs might still feel heavy from the summit. The pace will be steady, and we’ll take breaks when anyone feels tired. The trail down is easier than the climb up, but it’s still important to watch your footing and stay hydrated.

When we reach Machhermo, you’ll get a sense of returning to lower altitude, and the lodges here feel more lively compared to the quiet of Base Camp. Once there, you can relax and get ready for the next day’s longer trek toward Namche Bazaar. Overnight.

Max Altitude: 4470 m

We’ll leave Machhermo in the morning and start descending toward Namche Bazaar. The trail goes down gradually, but the legs will feel the strain after the high-altitude days, so we’ll keep a comfortable pace. There are a few steeper sections, so it’s important to pay attention to your steps and use trekking poles if needed.

Along the way, the air feels noticeably easier than up high, and you’ll notice your breathing becoming less labored. When we reach Namche, we’ll check into the lodge and go over the plan for the next day to make sure everyone knows the timing and route back to Lukla.

Max Altitude: 3440 m

We’ll start the trek toward Lukla after breakfast. The trail is mostly downhill, but it still takes attention because your knees and ankles have been working hard all week. The group will move at a steady pace, and we’ll stop a few times to stretch legs and check on how everyone’s feeling.

Lukla feels busier after the quiet of the high mountains, and once we arrive, you’ll handle your luggage and settle logistics for the flight back to Kathmandu the next day.

Max Altitude: 2860 m

We’ll take an early flight from Lukla back to Kathmandu. The flight is short but the approach to the runway is dramatic, so it’s something you’ll remember. Once in Kathmandu, you’ll sort your bags and transfer to the hotel.

There’s time to handle any last minute things like paying guides, buying small souvenirs, or just walking around a bit to get refreshed after the trek. The city feels busy compared to the mountains, and it’s a chance to transition back to normal life before your international departure. Overnight in Kathmandu.

Max Altitude: 1400 m

Today you’ll head to Tribhuvan International Airport for your flight home. Depending on your flight time, you might have a bit of time in the morning to organize your things or have a final meal in the city. The transfer to the airport is straightforward, and your guide or driver will make sure you get there on time. It’s the end of the trek, so you’ll have a moment to reflect on the week, say goodbye to the team, and get ready for your journey home. 

Max Altitude: 1400 m
Plan An Amazing Private and Tailor-Made HolidaysNot satisficed with this itinerary? Share your idea with our travel Expert. We make your dream come true.
Customize Trip
Cost Details
Includes
  • Three nights Hotel accommodations in Kathmandu on B/B basis;
  • Pick up and drop from Kathmandu airport to airport.
  • 3 meals a day (Breakfasts, Lunch and Dinners with a cup of tea or coffee) during the trek and climbing period.
  • Full board Accommodation of Lodges, Guesthouses in Twin Sharing Bases during the trek and tent will be available during the climbing period
  • All camping equipment in Base camp;
  • Flight Ticket from Kathmandu-Lukla-Kathmandu for member and Staff
  • 10 kg baggage allowance in flight and 25 Kg during trekking (with porter or yaks);
  • Surface transportation will be available as per itinerary;
  • Trekking Permit (National Park entry fee)
  • TIMS card (Trekking Information Management System) Permit
  • Climbing permit for Phari Lapcha Peak
  • Necessary staff during the trekking and climbing period With Experience Guide and Porter.
  • Necessary experienced Government license holder Climbing guide during climbing period as per group size
  • Facility of Food, accommodation, salary, insurance, equipment and medicine for all trekking staff.
  • Group medical supplies (First Aid medical kit will be available)
  • One tent will be available in the Base camp for 2 people on shared basis;
  • High altitude food and all climbing crew will be available above base camp.
  • Necessary fixed and dynamic ropes will be available during climbing period
  • necessary kitchen crew will be available in base camp
  • All necessary paper works, office Service charge and Government Taxes
  • Complete pre-departure information, flight ticket reconfirmation and extend visa service(if necessary)
  • Farewell Dinner in Kathmandu before departure.
Excludes
  • Lunch and dinner in Kathmandu.
  • Emergency rescue evacuation if required.
  • Personal accident insurance or Helicopter rescue.
  • Airfare international flights
  • Nepal entry visa fee, Visa issuance is easy at the arrival
  • All bar bills and personal expenses (phone calls, laundry service, battery recharge, bottles of water, hot water, etc.)
  • Alcoholic beverages, Mineral water, laundry, phone calls, internets.
  • Personal climbing equipment
  • All kind of Personal Expenses
  • Ice fall fees Garbage Deposit (Sharing with other member) if applicable.
  • Wake talkies &Filming permit.
  • Any others expenses which are not mentioned on Price Includes section
  • Tips, gifts, souvenirs.
Essential Information

Phari Lapcha Climb Difficulty

Look, climbing Phari Lapcha Peak is not something you do for fun selfies. The Phari Lapcha Peak climbing difficulty is real. You’ll be walking on snow, crossing glaciers, and sometimes wondering why you didn’t just stay in Namche Bazaar drinking tea. It’s high-altitude trekking and mountaineering all in one, and it will push your body and your brain.

  • Your legs will get seriously tired. Long days on rocky trails, snow, and ice are no joke.
  • Breathing gets hard. The thin air at over 6,000 meters makes even small steps feel like a workout.
  • You need basic mountaineering skills. Crampons, ice axes, and ropes aren’t just decoration.
  • Mentally, it’s a grind. Patience, focus, and a little stubbornness go a long way.
  • The route is quiet and less crowded than other Everest region peaks, which is awesome, but also means you can’t rely on anyone else to rescue you if you mess up.

At the end of the day, the Phari Lapcha climb difficulty is exactly why climbers who love serious Himalayan adventures come here. You sweat, curse the snow a little, and push yourself and the views from the top make it feel like you actually earned it.

Phari Lapcha Peak Climbing in Spring

When you search for the best time for the Phari Lapcha trek, spring and autumn are what everyone will tell you, and honestly, they are right. These are the best season for any peak climbing in Nepal as well as Himalayan treks. In spring, from March to May, the weather starts to warm up, the snow on glaciers is easier to walk on, and the mountains start showing off like they are putting on a photo shoot just for you.

Pros of Peak Climbing in Spring:

  • The skies are usually clear, so you get those insane views of Khumbu peaks, Gokyo Lakes, and the surrounding Himalayas. You will probably take more pictures than you planned.
  • Snow conditions are stable on glaciers and slopes, so you won’t feel like you are ice-skating your way to the summit.
  • Temperatures are manageable. You won’t be freezing every two steps, and you might even enjoy trekking without constantly shivering.

Cons of Peak Climbing in Spring:

  • It’s popular, so sometimes you will see other climbers around. Don’t worry, it’s not like Kala patthar Hiking busy, but you’re not entirely alone.
  • Afternoon sun can melt some snow, making parts of the slope a little slippery. Watch your step or you might look cooler than planned by sliding.
  • Lower trekking sections can be muddy from melting snow and spring rain, so those boots of yours will get some character.

Phari Lapcha Peak Climbing in Autumn

Autumn, from September to November, is the other “everyone will tell you” season for the Phari Lapcha trek, and they are right again. The weather is stable, the skies are mostly clear, and the snow on glaciers is firm enough to make climbing feel okay without constantly worrying about sliding. Honestly, this is the season most people aim for when they think about Everest region peak climbing.

Pros of Peak Climbing in Autumn:

  • The mountains are visible almost every day, making it easier to plan climbs.
  • Temperatures are cooler but comfortable for trekking and mountaineering.
  • Snow and glacier conditions are solid for high altitude climbing.

Cons of Peak Climbing in Autumn:

  • Trails and base camps near Gokyo are busier.
  • Climbing permits and guides must be arranged well in advance.
  • Complete peace and less crowded trail is hard to find.

Phari Lapcha Peak Climbing in Summer

Summer, from June to August, is the monsoon season in Nepal. This makes the Phari Lapcha climb difficulty higher because of rain, snow at higher altitudes, and clouds hiding the mountains.

Pros of Peak Climbing in Summer:

  • Valleys and lower trails are green and lively.
  • Fewer climbers on the trail make for a quieter experience.

Cons of Peak Climbing in Summer:

  • Heavy rain and snow make glacier travel risky.
  • Mountains can disappear behind clouds for days at a time.
  • Muddy trails in lower sections make walking harder.

Phari Lapcha Peak Climbing in Winter

Winter, from December to February, is cold, harsh, and very quiet. It is for serious climbers who don’t mind the cold and want almost empty trails.

Pros of Peak Climbing in Winter:

  • Very few people, so the mountain feels private.
  • Clear skies sometimes give great views in the early morning or late evening.
  • Frozen snow can make glacier travel easier for experienced climbers.

Cons of Peak Climbing in Winter:

  • Temperatures drop very low, especially at night.
  • Short daylight hours mean less time for trekking and climbing each day.
  • Frostbite and other cold related risks are higher.

Gears and Equipment for the Phari Lapcha Peak Climbing in Nepal

Climbing Phari Lapcha Peak is serious business. This is high-altitude trekking and mountaineering in the Everest region, and skipping the right gear can turn the adventure into a long, miserable day. Every piece of equipment matters because the mountain does not care if boots pinch or if the ice axe is left behind.

  • Mountaineering boots that handle snow and ice well and fit crampons without making feet scream
  • Ice axe and crampons for glacier sections and steep slopes because slipping is not an option
  • Climbing harness and ropes for tricky spots where a fall could ruin the day
  • Layered clothing including a warm jacket, gloves, hat, and face protection because temperatures swing a lot
  • Sleeping bag and down jacket for freezing nights at base camp or cold nights that feel like they will never end
  • Backpack that can fit all gear comfortably without turning every step into a test of patience
  • Sunglasses and sunscreen to stop the sun and snow glare from making eyes feel like they are on fire
  • Trekking poles to save knees and energy on approach trails because tired legs hate uphill climbs
  • Small first aid kit with medicine for altitude sickness, bandages, and painkillers because little problems can quickly become big ones
  • Snacks and water with a purification method because being hungry, tired, or dehydrated is worse than cold

Having the right gear is more than just looking prepared for mountaineering or trekking in Nepal. It makes the Phari Lapcha climb safer, more enjoyable, and far less stressful. Being ready means the mountain challenges the body without constantly reminding how unprepared it can feel. Proper equipment lets the adventure feel like an achievement rather than a struggle.

Acclimatization and Health Tips for the Phari Lapcha Peak Climbing in Nepal 

Climbing Phari Lapcha Peak is not like going for a regular hike. The air gets thinner and thinner the higher you go. Even walking slowly can feel like a mini workout for your lungs. That is why walking on the same speed is everything.

Take it easy on the climb. Stop when the legs ask for it. Breathe deeply and give the body a chance to adjust.

Water and snacks are lifesavers. Keep drinking often, and eat enough to keep energy up. Nuts, chocolate, or energy bars are great for long days on snow and glaciers. Sleeping well at camps is important too. Nights can get really cold, so warm clothes and a good sleeping bag make a huge difference.

Pay attention to how the body feels as altitude sickness on the Phari Lapcha Climb is not a small risk. Feeling dizzy, unusually tired, or off balance is a signal to slow down. Small breaks, hydration, and staying comfortable in layers help the body cope with the altitude.

Take the time to adjust properly, and the climb stops feeling impossible. Instead, it becomes one of those adventures that’s tough but fair, and standing on the summit becomes something truly worth remembering.

Preparation and Training Tips for Phari Lapcha Peak Climbing

If you’re planning to climb Phari Lapcha Peak, the first thing to know is that this is not just a regular trek. The trails to Gokyo are long, glaciers can be tricky, and snow slopes will push your legs and lungs. The air gets thinner the higher you go, and the weather changes fast. Being ready before you start makes the climb way more manageable and actually fun.

Start with building stamina. Long walks, running, cycling, or climbing stairs a few times a week will get your legs, lungs, and heart ready for multi day trekking in the Everest region. Even carrying a backpack during your practice walks helps your body get used to the weight you’ll carry on the mountain.

Work on leg and core strength too. Squats, lunges, or simple bodyweight exercises at home will make steep slopes and rocky landscapes much easier. Balance matters as well because glaciers and uneven trails don’t wait for you to trip. Try walking on uneven ground or small hills to practice stability.

Getting used to high altitude is another key part. If possible, try smaller Himalayan treks or even high altitude walks in Nepal before tackling Phari Lapcha. Move at a comfortable pace, drink lots of water, and rest whenever your body asks for it.

Don’t forget gear practice. Wear your boots, crampons, and use trekking poles during practice hikes. Knowing your equipment inside out before the climb saves a lot of frustration on the trail.

Do all this, and the Phari Lapcha climb goes from feeling like a battle to a real Himalayan adventure. Your legs will be stronger, your lungs ready, and the summit will feel like a proper achievement you actually earned.

Safety and Risks for Phari Lapcha Peak Climbing

Climbing Phari Lapcha Peak is beautiful, but it can bite if you’re not careful. The trails in the Everest region pass through glaciers and snow slopes that can get slippery. One wrong step and it can turn a simple walk into a scary slide. Paying attention and moving carefully can make the climb safe.

The weather changes fast on the mountain. One moment the sun is warming your back and the next the wind is icy and clouds roll in. Being ready with proper gear and listening to your guide makes a big difference on a Phari Lapcha Peak climbing adventure.

Glaciers have hidden spots where the snow is soft or cracks appear. Using crampons, trekking poles, and taking your time to test each step keeps things safer. Even if moving slowly feels boring, it is better than rushing and risking a fall.

Fatigue can make small risks worse. When your legs are tired and your mind is foggy, simple trails feel harder. Drinking water, eating snacks, and taking breaks makes the Everest region trek and Phari Lapcha Peak climb more hassle free. The goal is not to rush but to be smart and alert so the climb stays challenging, fun, and safe.

Accommodation, Food and Water on the Phari Lapcha Trek

One good thing about Phari Lapcha Peak Climbing in Nepal is that the trail does not feel too rough in the beginning. Up to Namche, Dole, Machhermo, and Gokyo, you’ll usually stay in teahouses. 

like Namche, Dole, Machhermo, and Gokyo have simple teahouses where you can sleep and get a hot meal. The rooms are basic and toilets are shared most of the time. Hot showers are rare but not impossible. After a long day on the trail, it is enough to rest and recharge.

Once you leave Gokyo and start the real climb, things change. You will be camping near base camp and higher up because there are no lodges on the upper sections of the mountain. It is simple but it works and you get used to it quickly.

Food along the route is straightforward. You will mostly eat dal bhat, noodles, soup, eggs, potatoes, porridge, bread, and tea. It is not fancy but it keeps you going. At high altitude, your body does not care about variety, it just wants something hot to eat.

Water is easy to get in the villages but higher up you need to treat or boil it. Streams and melted snow are your main sources. Carry a water bottle and something to purify it. Buying bottled water the whole way is expensive and creates extra waste.

Do You Need Travel Insurance for Phari Lapcha Peak?

Yes, you really do. Climbing Phari Lapcha Peak in Nepal is not something you do casually. It’s high altitude, there’s snow and glaciers, and the weather can change fast. Things happen even to experienced climbers, and if you get stuck or sick, getting help can be expensive.

The main thing is your insurance actually covers high altitude trekking and climbing. Some policies only cover normal hiking, which is useless when you’re on a 6,000 meter peak. Make sure it also includes emergency evacuation, because a helicopter ride from the Everest region is not cheap.

It’s also good if it covers medical treatment, trip delays, or lost gear. Flights to Lukla often get delayed, and gear can get lost or damaged on the trail.

In short, travel insurance is not optional if you want to stay safe and avoid surprises. Just make sure it actually works for mountaineering in Nepal, otherwise it’s just paper.

How Should You Manage Money for Extra Stuff on the Phari Lapcha Climb?

Honestly, money on the Phari Lapcha Peak trek can get tricky if you don’t plan. Most teahouses take cash only and ATMs in the Khumbu either run out or don’t work most of the time. You will want extra for tea, instant noodles, snacks, small meals, or even a tip for the lodge staff.

For example, you might finish a long day walking from Machhermo to Gokyo and all you want is a hot cup of tea to warm up. If you did not bring cash, you will either have to skip it or stress about finding an ATM.

The best way to handle this is to carry enough Nepali rupees in small notes, split between your backpack and your jacket pocket. That way you are covered for small daily expenses and do not have to worry while focusing on the climb.

FAQs

Honestly, it’s mostly the altitude that makes it tough. The trek to Base Camp and High Camp is long, but nothing super technical until the summit. If you’ve done some trekking before and are reasonably fit, you’ll manage fine. The key is watching your speed and listening to your body.

You’ll need the usual high altitude stuff like boots, crampons, harness, helmet, ice axe, and warm layers. Tents and cooking stuff are handled at Base and High Camp, but make sure your personal climbing gear fits well and is comfortable. You don’t want it messing with you on the climb.

Safety always comes first. Weather can change fast up there, so the guide will make the call. If the conditions or the group aren’t ready, we’ll wait or turn back. Moving carefully and sticking together is the best way to stay safe.

Yes, Nepal Trekking Routes can tweak things to match your schedule, fitness, or preferences. We can add extra rest days, change lodges, or even adjust parts of the route if needed. The idea is to make the trek more enjoyable for you.

Groups are usually small, around four to eight trekkers, sometimes a bit bigger. That makes it easier to move at a good pace, get attention from the guides, and stay organized.

We take it slow and give your body time to adjust. Rest days in Namche and Gokyo help a lot, and the hikes are planned to gradually increase altitude. The guide will check on you every day, and if anyone feels off, we adjust the pace or take extra time to recover.

It can be cold and windy, especially at Base and High Camp. Temperatures drop a lot at night. During the day, it can feel warmer in the sun, but layers are essential. Weather can change fast, so be ready for everything.

It’s limited. Some lodges in Namche or Gokyo have charging options, usually for a small fee. At Base and High Camp, there’s very limited or no power, so bring power banks if you need them.

Your guide will always carry communication devices and know the nearest evacuation options. Helicopter evacuations are available in emergencies, but they depend on weather and cost extra. Following the guide’s instructions and moving at a safe pace minimizes risks.

It’s very important to stay hydrated, especially at high altitude. You should aim to drink at least 3 to 4 liters a day. Water is available at lodges and camps but may need to be boiled or filtered. Carry a reusable bottle and purification tablets or filters if you prefer.

20 years of Adventure
Why Travel with Nepal Trekking Routes?
We Care for Your Safety
Nepal Trekking Routes always focus on safety, and satisfaction of our valued clients. Our Trekking guides are highly experienced and trained to operate various group trekking trip in high Himalaya.
Provide Financial Protection
NTR prioritize healthy financial safety for clients, ensuring proactive safeguarding of client interest. Our commitment strengthens our role as trusted partners maintaining standards with dedication and Excellence.
100% Local Guide
100% Local Guide
Traveler looking for experience authentic insights through trekking in Nepal NTE offer your 100% local guide who help you to experience unique perspective ensuring and enriched journey customize to your interest.
Personalized Service
We always provide one guide and one porter to two guests in order to meet our standard of providing standard service. Impeccable hospitality and quality services are guaranteed while traveling with us.
Know More
You May Also Like
Island Peak Climbing
18% OFF
FromUS$1990US$2345
Larkya Peak Climbing
18% OFF
FromUS$3150US$4000
Bokta Peak Climbing
18% OFF
FromUS$4150US$4500
Book Now